Wednesday, August 23, 2006

Corn Bread, and a bit of Avocado Fruit Salad

Since corn meal has no gluten (and is also very dry), use a ratio of about 40% corn meal to 60% AP flour.
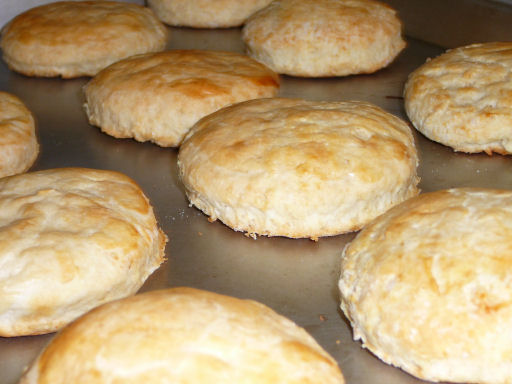
Corn Bread

- 1 cup bleached AP flour
- 3/4 cup corn meal
- 1/4 cup sugar (I like mine a tad sweeter)
- 1.5 Tbsp baking powder (for a bit fluffier of a texture)
- 1 tsp salt
- 1 large egg
- 2/3 cup milk
- 4 Tbsp melted butter

  1. Combine dry ingredients. In another bowl, combine melted butter, milk, and egg.
  2. Add butter mixture to flour mixture; stir until batter is slightly liquidy and lumpy.
  3. Pour into ~ 8" x 8" metal baking pan. Grease pan or dump some vegetable oil in beforehand. Preheat oven to 425 degrees C.
  4. Bake 20-25 minutes, or until toothpick in center comes out clean.


Variations include adding lemon poppyseed cornbread muffins, banana cornbread (might make the end result a bit less dry), cornbread with cheddar cheese, etc...

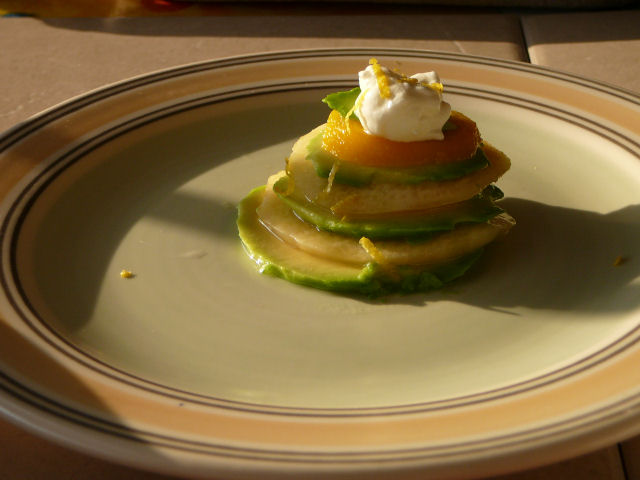
Lastly, here's my take on a summer-y fruit salad/dessert. My dad loves eating avocado with a bit of lemon juice and sugar; it's a delightful cool treat to have on a hot summer's day. Not to mention the health benefits of eating avocado.


Avocado Fruit Salad

- thinly sliced avocado
- thinly sliced fruits (white peaches, yellow peaches, mangos, white nectarines, etc...)
- a bit of whipped cream
- unrefined sugar
- fresh lemon juice, zest

  1. Set an avocado base, sprinkle with lemon juice, unrefined sugar.
  2. Layer with other fruits, and more avocado slices.
  3. Top with a bit of whipped cream, and lemon zest.
  4. Refrigerate about 15-20 minutes before eating.


Thursday, August 17, 2006

Biscuits Update

Thought I'd add some pictures of the Buttermilk Biscuits, as I made a fresh batch today.

Making biscuits with my Roul'Pat:


Before baking:


After baking:

Sunday, August 13, 2006

Panko Mini Crabcakes and Buttermilk Biscuits

Buttermilk Biscuits

- 2 cups all-purpose flour (as white as possible)
- 2 1/2 tsp baking powder
- 1/2 tsp salt
- 1/2 tsp baking soda
- 1 1/4 sticks butter
- 3/4 cup buttermilk

  1. Mix together first 4 ingredients in bowl.
  2. Cut butter into 1-cm cubes, and add in. Use the back of a fork, or two knives to work into the flour.
  3. When flour is crumbly, add in buttermilk all at once.
  4. Be careful NOT to knead the dough, or else you will form glutens and the biscuits will not be fluffy.
  5. Gather dough into a ball, roll into rectangular sheet of 1/2" thick.
  6. Create rounds using a cookie cutter.
  7. Gather remaining scrap dough into a ball, making more biscuits until all dough is gone.
  8. Brush generous amounts of buttermilk on tops of biscuits before baking, will brown nicely.
  9. Bake for 18 minutes at 400 degrees F.


Panko Mini Crab Cakes (from August 2006 edition of Bon Appetit)

- 1/4 cup mayonnaise
- 2 Tbsp cilantro (I prefer this over parsley)
- 1 Tbsp Dijon mustard
- 2 tsp Worcestershire sauce
- 1/2 tsp salt
- 1/2 tsp freshly chopper garlic
- dash of sesame oil

- 16 oz. jumbo lump crabmeat, strained/patted dry
- 10 Tbsp + 3/4 cup finely ground Panko crumbs
- 4 green onions, minced
- 1 large egg, beaten

olive oil for frying

Whisk together first section's ingredients.

  1. Then add crabmeat, egg, green onions, and 10 Tbsp processed Panko crumbs.
  2. Shape mixture into cakes.
  3. Roll cakes in remaining breadcrumbs to coat.
  4. Refrigerate before frying.
  5. Fry in olive oil over medium heat until golden brown, or about 4 minutes per side.
  6. Place in oven to keep warm.
  7. Serve with roasted pepper sauce and fresh cilantro for garnish.

Some images of my dinner tonight;

Ensemble picture of Panko Crab Cakes, Ginger Sauteed Green Beans, Roasted Pepper Aioli, Buttermilk Biscuits, and Pink Lemonade.


For dessert, chocolate cheesecake with rum apricot glaze, fresh fruit and chocolate shavings.

Saturday, August 12, 2006

Roasted Pepper Aioli and Pink Lemonade

Part I of my Crab Cakes recipe today, to be served along with fresh buttermilk biscuits, which will be made tomorrow.

First, I made a Pink Lemonade to complement my summery dish, with a recipe from Fine Cooking.

Pink Lemonade

- ~ 1.5 cups granulated sugar
- 1 cup coarsely chopped fresh strawberries
- Zest of 2 lemons (I used 6 lemons)
- 2 cups fresh lemon juice (I used about 3)

  1. Combine sugar and strawberries with 2 cups water in medium sauce pan.
  2. Bring to boil, stirring occasionally.
  3. Reduce heat to low, and simmer until berries begin to release their color and soften slightly, about 3 minutes. Stir in lemon zest.
  4. Let cool completely.
  5. Pour cooled syrup over a fine sieve into a transparent pitcher, and press solids with back of spoon.
  6. Discard pressed solids.
  7. Add lemon juice, and dilute with cold water to taste.
  8. Add sugar to taste.
  9. Cool in refrigerator (can be made several days ahead).

I also added in several cucumber slices to further enhance the 'coolness' of the drink.


Roasted Bell Pepper Aioli

- 1 yellow, 1 red Large Bell Peppers
- 2 TBsp Mayonnaise
- 2 TBsp Sour Cream
- Clump of Cilantro
- Salt and Pepper to taste

  1. Wash and clean peppers. Brush with olive oil, and grill until skin starts to peel off. In lieu of a grill, use a toaster oven and hit the toast cycle several times.
  2. Peel off skin, and puree in food processor along with cilantro.
  3. Mix in mayo, sour cream, and salt/pepper.
  4. Save for later, good with most seafood dishes.

Saturday, August 05, 2006

Mini Quiches and Pate Brisee

My plan for this weekend (may or may not get done).

1) Shortcakes with fresh fruit and pomegranate whipped cream.
-I thought this would be an interesting take on a hamburger. Instead of a bun, you have shortcakes, and instead of meat, you have whipped cream and fresh fruit.

2) Mini white wine spinach portabella quiches.

3) Same mini peach cheesecakes, but top with fresh fruits and apricot glaze. Variations with chocolate cheesecake (it's so rich, it almost tastes like a mousse.)

4) Mini tiramisus in transparent plastic cups.

5) Dungeness crab cakes with buttermilk biscuits, and roasted red pepper sauce.

6) Sauteed green beans

7) Fresh pink lemonade.

To do later this week if I have time:

Panna Cotta, Crab Cakes, Pink Lemonade, Blueberry Pluot Cake


Okeydokey, first off, the Pate Brisee (Short Crust Pastry) recipe, to be used for quiches and other savory tarts.

Pate Brisee Recipe

- 2.5 cups AP Flour (I like to use about 50/50 white/whole wheat flour)
- dash of salt, sugar
- 2 sticks of unsalted, chilled butter cut into 1-cm squares
- 1/4 to 1/2 cup ice water

  1. Blend in food processor (or use the back of a fork/two knives to dice up the butter into the flour). Gradually add in water, and remove from food processor when the dough starts to stick together. Work the dough out on a floured surface (like my Roul'Pat, or any counter).
  2. Refrigerate 30 minutes to 1 hour before using.
  3. Roll out a clump for usage, fill tart/pie shell, cut off excess. Prick holes with fork, fill tart pans with pie weights or dried beans, let refrigerate for 20 minutes before baking to relax the gluten. Try not to stretch the dough too much, or else it will shrink during baking.
  4. Bake ~ 20 minutes at 350 degrees F (depends on your oven) until LIGHTLY browned.
  5. Cool on wire rack.

Quiche Filling

  1. After the pie shells have been baked (usually the day before), sautee together chopped baby spinach leaves, mushrooms, and other items of your choice (seafood, bacon, onions, etc...). Add in some white wine.
  2. Make another separate mixture of 4 eggs and 2 cups of half/half (or light cream).
  3. Add in shredded/cubed cheese into the bottom of each tart pan. Add spinach/mushroom mixture to each quiche.
  4. Then fill with egg/half and half up to the top.
  5. Bake at 350 degrees for ~ 40 minutes, or until quiches are set and a knife inserted into the center comes out clean.

Non-stick quiche pans with removable bottoms work best!


Tuesday, August 01, 2006

Henckels Pro S 7" Hollow Edge Santoku Knife Review

Taking a break from cooking, I think I'll review a few kitchen gadgets that I have.

First up is the Wusthof Classic 7" Hollow Edge Santoku Knife.


As with all kitchen knives, go with whatever feels the most comfortable. For stainless steel knives, I'd recommend either the German Wusthof Classic/Culinar/Grand Prix or Henckels Pro S lines (avoid their cheaper stamped products at all costs!), the Japanese Shun, or the ceramic Kyocera knives. A brief note about the Kyoceras- while they are extremely sharp, ceramic is brittle and will break/chip if accidentally dropped. Which would also result in a dent upon one's wallet as well.

Yes, these knives are pricey, but they will last a while, and you can get away with sharpening them every 6 months or so (depending on usage). Above all, they make cooking much more enjoyable and efficient, so they're a good investment.

So onto the Henckels Pro S Hollow Edge Santoku review. There's not much difference between the Wusthof and Henckels Pro S knives, both being made from forged stainless steel, full tang, bolster, (I prefer the classic 3 rivet look of the Pro S/Classic series), although the one key discrepancy is that the Wusthofs have a "curvier" blade, to facilitate the rocking motion when chopping. I prefer the Wusthofs slightly more in this regard, although for the Santoku, there's not much difference since they're both flat blades. Financially speaking, the Pro S series seems to go for a bit less on eBay, I'm not sure why.

The Santoku knife is wonderful for chopping vegetables. As you can see, the most distinctive feature of this knife are the hollow edge grounds cut into each knife blade. These are theoretically supposed to create air pockets to prevent chopped vegetables from adhering to the blade, but in practice I find that it doesn't do much except look fancy and high tech. You'd do just as well getting the cheaper non-hollow ground santoku, and rub some salt along the blade instead.