Thursday, May 28, 2009

Sangria

Perfect drink on a hot summer's day. Makes enough for 6-8. I like mine a little frizzy, so I included club soda/ginger ale.

Sangria

- 1.5L White Zinfandel
- 1 orange, cut into slices
- 2 peaches, cut into slices
- 1 cup raspberries
- 8 oz. club soda or ginger ale

  1. Add first 4 ingredients together.
  2. Let sit overnight in refrigerator.
  3. Add club soda/ginger ale before serving.


Ready for consumption.

Wednesday, May 27, 2009

Watermelon Basket Carving

It would have been terribly pedestrian if I brought a regular fruit salad to a picnic, no? Well, why not make a watermelon basket instead.

Here are my step by step pictures. It really helps if you have a small paring knife and a flexible boning knife. Also, a melon baller would be ideal; not having one, I used my measuring teaspoons, which are fortunately hemispherical. Additionally, if you have a channel knife, you can engrave more ornate designs into the sides and handle.


First, pick a medium sized melon. Then cut a small flat slice from the bottom of the watermelon so that it can sit upright without tipping over. Then, cut off two quarters from the upper portion of the melon, while leaving the handle.


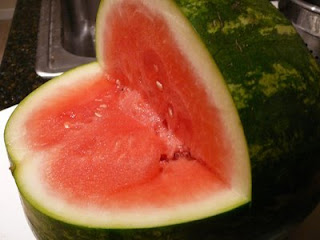
Now, remove the meat from underneath the handle.


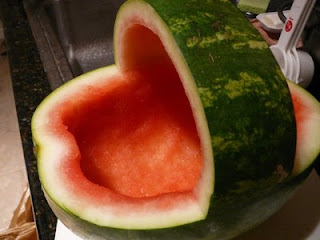
Next, scoop out all the flesh from the interior of the watermelon, reserving it for later.


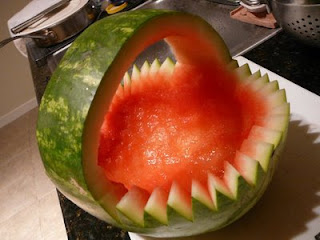
Cut whatever patterns you want into the rim of the "basket". I chose to make easier V-shaped cuts. Alternatively, you could cut around a stencil with more ornate designs.


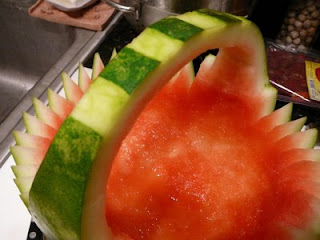
Lastly, I thinned the handle and cut block patterns from the skin. Remember, resist the urge to pick up your basket from the handle!

Refrigerate until further use (but no more than a few hours); mix fruits in another bowl, and refill watermelon basket. Unfortunately, due to logistical reasons, I had to make the basket in advance. It was frozen in my refrigerator, and upon presentation, didn't look as good as when it was fresh. Oh well.

Honey Oatmeal Whole Wheat Bread + Sunflower Seeds

Honey Oatmeal Whole Wheat Bread + Sunflower Seeds

- 1 1/8 cups lukewarm water
- 2 1/4 cups quick oats
- 1.5 Tbsp ~ 1.5 packets Active Dry Yeast
- 4 Tbsp honey
- 2 Tbsp brown sugar
- 1 stick softened butter
- 3/4 cup applesauce
- 2 tsp salt
- 3.5 cups flour
- 1/2 cup sunflower seeds
- 1 Tbsp regular oats
  1. Add quick oats to lukewarm water, let soften.
  2. Dissolve yeast in a couple tbsp of lukewarm water.
  3. Add the rest of the ingredients to the oats. I used about 1.5 cups White Whole wheat flour and 2 cups Unbleached All-Purpose flour.
  4. Knead in stand mixer; sprinkle sunflower seeds into dough while mixing.
  5. Place dough in lightly greased bowl, let stand 2 hours.
  6. Gently deflate dough, divide into 2-3 loaves.
  7. Do the second rise in the refrigerator overnight.
  8. Brush top with milk, sprinkle with regular oats.
  9. Bake at 350 degrees F for 40 minutes; loosely tent with aluminum foil for 10 more minutes.
  10. Cool on wire rack.


Fresh from the oven, cooling on my wire rack.


The recipe will yield 3 small boules.

Saturday, May 16, 2009

Sourdough Bread, Sourdough Starter, Sourdough Pancakes

The sourdough pancakes which you make using the unfed starter are delicious and heavenly. They're so light, and have fantastic flavor. You can eat a whole stack of them (which I did) without feeling bloated.

For best "sour" results, try to retard the fermentation. The best way to do this is to make a good starter by leaving it outside for 3+ days, and by having a nice slow cool rise in the refrigerator.

The bread turned out very well; a slight mild sour tang with a light texture and superb crust.

Sourdough Starter

- 2 cups lukewarm water
- 1 Tbsp sugar
- 1 packet active dry yeast
- 2 cups Unbleached AP Flour

  1. Mix together water, sugar, and yeast.
  2. Stir in flour gradually, cover with a dishtowel.
  3. Leave out on the counter-top for 3-4 days. Yes, you read that right. Don't worry though, the yeast is very hardy, and we want to incorporate wild yeast cultures into the starter to give the dough its special flavor. It will be a tasty science experiment!
  4. After 3 days, refrigerate.
  5. 12 hours before starting the recipe, "feed" your starter. Ideally, you should feed your yeasts once a week, but once a month is fine too.
  6. Remove 1 cup of starter (reserve for pancakes), and add in 1/2 cup lukewarm water + 1 cup flour.
  7. Leave now-fed starter back in refrigerator until you need to use it.

Sourdough Pancakes

- 1 cup starter (overnight starter works fine as well)
- 1 egg
- 2 Tbsp sugar
- 1/2 tsp salt
- 4 Tbsp vegetable oil
- 1 tsp baking soda dissolved in 1 Tbsp water

  1. Mix together egg, sugar, salt, and oil.
  2. Fold egg mixture into starter. I was lazy and didn't bother to fold it, and the pancakes still turned out great.
  3. Add dissolved baking soda to mixture. Pancake batter will foam up, as the baking soda reacts with the acid in the starter.
  4. Pancake away- the batter will look slightly liquidy, but it's fine.

Sourdough Bread

- 2 cups FED sourdough starter
- ~ 1 cup lukewarm water (more, if needed)
- 4 cups Unbleached AP-Flour
- 1 Tbsp sugar
- 2.24 tsp salt
- 1/2 tsp sour salt (optional)

  1. Combine starter, water, and 3 cups of flour. Mix well.
  2. Cover, and let rest at room temperature for 1 hour. Refrigerate overnight, up to 12 hours.
  3. Add remaining ingredients, kneading to form a smooth dough.
  4. Divide into loaves (do this step first, don't want to risk deflating the dough later). Cut diagonal slashes into top of loaf with serrated knife.
  5. Let rise for 1 hour. Put in container, cover with plastic wrap.
  6. Refrigerate 12-24 hours.
  7. If baking cold dough right out of the refrigerator, then adjust oven 50 degrees higher during the pre-heating stage to 475 degrees F. ***Be careful, the max temp the Silpat can withstand is 482; best bake it straight on a sheet pan.
  8. Once the bread has been in the oven for a few minutes, turn down heat to 425 degrees F, and bake 25-30 minutes.
  9. Let cool on rack 10 minutes before cutting.
  10. Enjoy!


Sourdough bread version 2.0; still not sour enough.


But it was still tasty enough to eat most of the bread within a few minutes of cooling it. Texture was very good.

Sunday, May 10, 2009

Vanilla Biscotti

Recipe from King Arthur Flour's website. Tastes about the same as my prior biscotti recipes, though the edition of butter makes it a bit richer, more cookie like.

Biscotti
- 6 Tbsp room temperature butter
- 2/3 cup sugar
- 1/2 tsp salt
- 2 liberal tsp vanilla extract
- 1.5 tsp baking powder
- 2 large eggs
- 2 cups KA Unbleached AP-Flour

  1. Beat butter, sugar, salt, vanilla, and baking powder until mixture is smooth and creamy.
  2. Beat in eggs, batter may look curdled.
  3. Add low speed, beat in flour.
  4. Shape dough into bottom portions of two loaf pans. Or, shape into any flat 3/4" thick flat log.
  5. Bake at 350 degrees F for about 25 minutes.
  6. Remove, let cool 10-25 minutes.
  7. Slice at angles into biscotti shapes.
  8. Bake at 325 degrees F for another 30 minutes. Let cool overnight on cooling rack.

Saturday, May 09, 2009

Cinnamon-Raisin Whole Wheat Bagels

I didn't have any bread flour on hand, so I used a mix of KA light whole wheat and unbleached AP. I made the second rise overnight in the refrigerator, to better develop the yeast flavors, and to adjust to my busy schedule.

Using a pre-ferment (aka sponge/poolish/starter) gives greater complexity of flavor. Combined with the long second rise in the refrigerator, the flavor was hearty.

The malt (or brown sugar if you have none) gives extra flavor and sweetness to the bagels. Adding malt to the water bath (supposedly) gives the bagels their shiny crust.

Some thoughts about the final product.

Texture: I think the texture turned out wonderfully, not too chewy. When the bagels were fresh from the oven, it had a crisp crust which was delicious.

Taste: A very subtle yeast aftertaste, although with cream cheese, I'd say this bagel tastes like Breugger's. The raisins were juicy and plump, although the dough needs more cinnamon.


Sponge/Starter

- 1/8 tsp active dry yeast
~ 3/4 lukewarm water
- 1 cup high gluten/bread flour

  1. Mix together until liquidy.
  2. Let sit about 14 hours.

Dough

- All of above starter
- 1 cup lukewarm water
- 2 tsp salt
- 3.5 cups high-gluten/bread flour
- 1 Tbsp non-diastatic malt powder or brown sugar
- 2 tsp active dry yeast
- 3/4 cup raisins, soaked in warm water, dried
- cinnamon/sugar
  1. Mix together ingredients. Use stand mixer with dough hook to knead the dough and develop the gluten. Knead roughly 7 minutes.
  2. Knead in raisins towards the end.
  3. Sprinkle work surface with cinnamon/sugar; knead dough to incorporate in.
  4. Let sit 1 to 1.5 hours, then punch down.
  5. Shape into mini-rounds. Then poke hole through the middle, and swing around finger.
  6. Do the second rise overnight in the refrigerator.
  7. Remove from fridge, let warm to room temperature, about 10-15 minutes.
  8. Prepare a water bath, add 1 Tbsp of malt powder or brown sugar to the bath.
  9. Boil each side, ~ 1 minute.
  10. Bake at 425 degrees F for about 20-25 minutes, flipping them over at the 15 minute mark.


Could use more cinnamon, but texture and crust were very good.