Watermelon Basket Carving
It would have been terribly pedestrian if I brought a regular fruit salad to a picnic, no? Well, why not make a watermelon basket instead.
Here are my step by step pictures. It really helps if you have a small paring knife and a flexible boning knife. Also, a melon baller would be ideal; not having one, I used my measuring teaspoons, which are fortunately hemispherical. Additionally, if you have a channel knife, you can engrave more ornate designs into the sides and handle.
First, pick a medium sized melon. Then cut a small flat slice from the bottom of the watermelon so that it can sit upright without tipping over. Then, cut off two quarters from the upper portion of the melon, while leaving the handle.

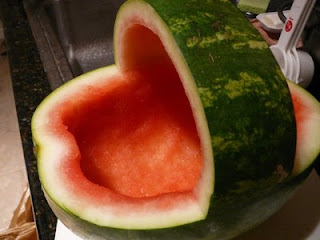
Now, remove the meat from underneath the handle.

Next, scoop out all the flesh from the interior of the watermelon, reserving it for later.

Cut whatever patterns you want into the rim of the "basket". I chose to make easier V-shaped cuts. Alternatively, you could cut around a stencil with more ornate designs.

Lastly, I thinned the handle and cut block patterns from the skin. Remember, resist the urge to pick up your basket from the handle!

Refrigerate until further use (but no more than a few hours); mix fruits in another bowl, and refill watermelon basket. Unfortunately, due to logistical reasons, I had to make the basket in advance. It was frozen in my refrigerator, and upon presentation, didn't look as good as when it was fresh. Oh well.


0 Comments:
Post a Comment
Subscribe to Post Comments [Atom]
<< Home